Trade Count Heatmap
What it is
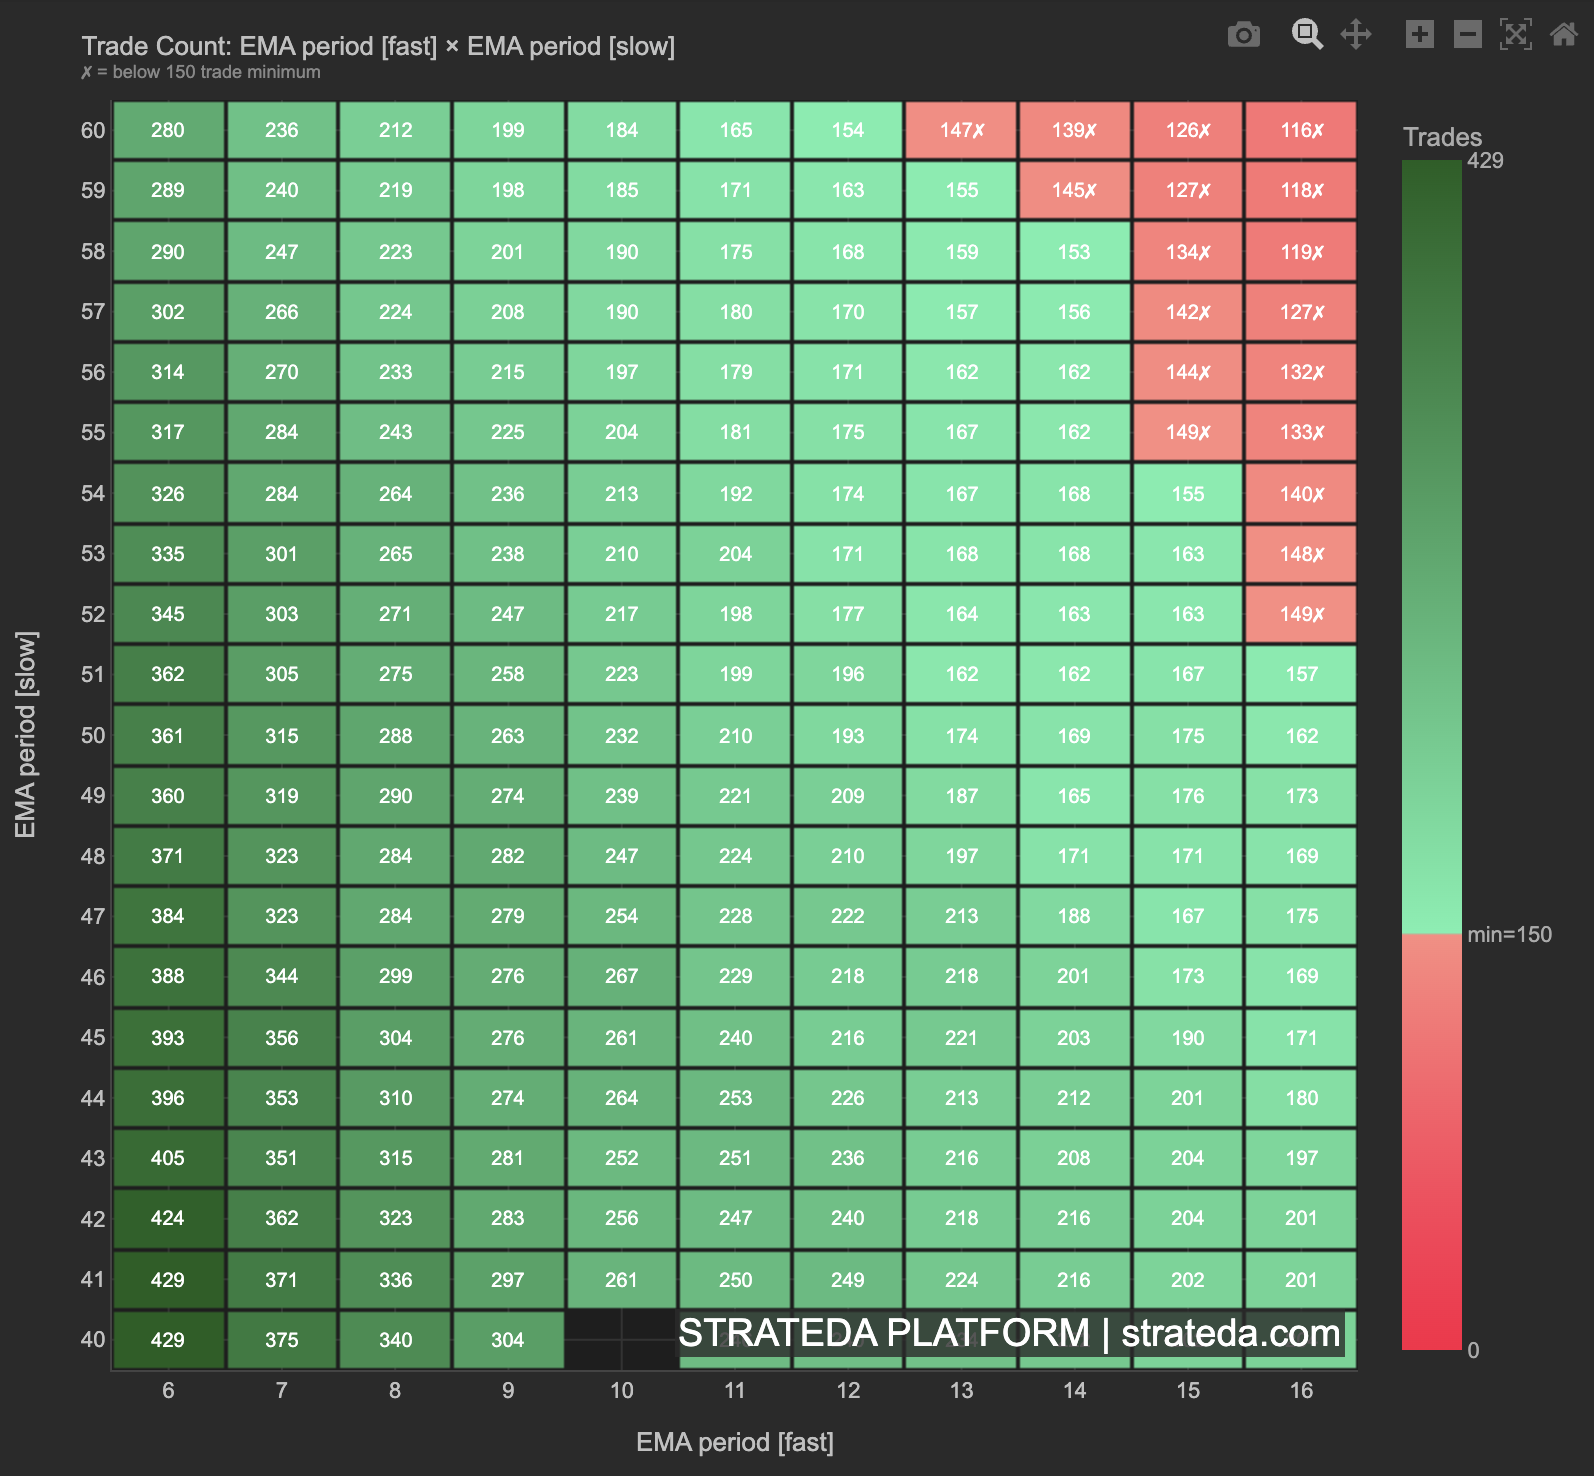
The Trade Count Heatmap shows the number of trades executed by each parameter combination in your optimization, plotted on the same 2D grid as the Sharpe heatmap. A high Sharpe ratio is meaningless if it comes from 5 trades — this view ensures you can distinguish statistically reliable results from noise.
Parameter choices directly affect trading frequency. Shorter indicator periods generate more signals and more trades; longer periods generate fewer. Understanding this relationship is essential because low-trade-count regions produce unreliable metrics — a Sharpe ratio calculated from 8 trades tells you almost nothing. This heatmap makes those regions immediately visible.
How to access it
Navigate to the Trade Count Heatmap Open C0 tab in the optimization analytics popup. Available on Plus plans and above. The "Open C0" label refers to the Open signal, Condition 0 — the first condition of your open signal.
The optimization analytics popup is accessed via the table icon in the View Panel after your optimization job completes. See The Strategy Panel & View System for full details.
What you see
- X-axis — Values of the first optimized parameter (e.g., EMA period: 5, 10, 15, ..., 65).
- Y-axis — Values of the second optimized parameter (e.g., DEMA period: 5, 10, 15, ..., 65).
- Cell color — Intensity represents the number of trades for that parameter combination. Brighter/warmer colors indicate more trades; darker/cooler colors indicate fewer trades.
- Cell values — The exact trade count is displayed within each cell or available on hover.
The grid layout is identical to the Parameter Heatmaps — the same cell positions correspond to the same parameter combinations. This makes direct visual comparison straightforward: overlay the Sharpe heatmap in your mind and check whether high-Sharpe regions also have sufficient trade counts.
How to interpret it
Trade count and statistical reliability
| Trade Count | Reliability |
|---|---|
| Below 30 | Unreliable — below Central Limit Theorem minimum. Metrics from these combinations should be disregarded or treated as directional only. |
| 30–50 | Marginal — directional signal but not statistically robust. Use with caution. |
| 50–100 | Reasonable — metrics are interpretable but confidence intervals are wide. |
| Above 100 | Strong — sufficient for reliable Sharpe, profit factor, and win rate calculations. |
What to look for
Uniform trade count across the grid: All parameter combinations generate a similar number of trades. Trading frequency is not parameter-sensitive. This is the simplest case — you can compare Sharpe values across the grid without worrying about sample size differences.
Gradient from high to low trade count: Shorter parameter periods (lower values) generate more trades; longer periods (higher values) generate fewer. This is expected — shorter moving average periods cross more frequently. Check that your preferred high-Sharpe region has enough trades to be reliable.
Low-trade-count corners or edges: Extreme parameter values often produce very few trades — either the indicator rarely triggers or the conditions are so restrictive that signals are rare. High Sharpe ratios in these regions are almost certainly noise. Cross-reference with the Robustness Analysis — isolated bright cells in low-trade-count regions will typically dim after neighbor averaging.
High trade count with low Sharpe: Regions with many trades but poor performance indicate the strategy concept does not work at those parameter values — a genuine finding, not a sample size issue. These regions are reliably bad.
Cross-referencing with the Sharpe heatmap
The most valuable use of this view is overlaying it mentally with the Sharpe heatmap:
- High Sharpe + high trade count — The best outcome. The result is both strong and statistically reliable.
- High Sharpe + low trade count — Suspicious. The Sharpe may be noise from a small sample. Do not trust without further validation.
- Low Sharpe + high trade count — Reliably poor. The strategy genuinely does not work at these parameters.
- Low Sharpe + low trade count — Unreliable and poor. Ignore entirely.
Example
Trade Count Heatmap for a DEMA × EMA crossover optimization on BTC (400 combinations):
- Lower-left region (short periods, DEMA 5–15, EMA 5–15): 180–220 trades per combination. High frequency, but the Sharpe heatmap shows these are mostly low-Sharpe — the strategy overtrends with short periods.
- Center region (DEMA 20–35, EMA 20–35): 80–140 trades per combination. Moderate frequency. This region contains the highest Sharpe values — and the trade counts are sufficient for reliable metrics.
- Upper-right region (long periods, DEMA 50–65, EMA 50–65): 12–30 trades per combination. Too few for statistical confidence. Despite some cells showing Sharpe above 1.0, these results should not be trusted without WFO validation.
Interpretation: The trader's preferred region (DEMA 20–35, EMA 20–35) has 80–140 trades per combination — well above the 50-trade minimum for reasonable reliability. The high-Sharpe cells in the upper-right corner with only 12–30 trades are filtered out as unreliable. The Trade Count Heatmap confirms that the center region is both the best-performing and the most statistically meaningful.