No-Code Strategy Design
What It Is
Strateda's strategy builder lets you design complete trading strategies through a visual interface. You select indicators from a curated set of strategy-compatible indicators — a subset of the full 75-indicator chart library that is fully integrated with the signal generation engine. See the Indicator Library for the complete list of strategy-compatible indicators. You define entry and exit conditions, set position parameters, and combine multiple conditions with AND/OR logic — all without writing code. The result is a fully specified strategy ready for backtesting, optimization, or live deployment.
The same indicator library and condition logic used across backtesting, parameter optimization, and walk-forward optimization is available through the visual interface. No coding is required at any stage.
How to Access It
Open the right panel and select the Strategy tab in the Strateda app at app.strateda.com. The builder is available on all plans, though the number of conditions you can combine depends on your subscription:
| Plan | Max Conditions |
|---|---|
| Free | 1 |
| Plus | 2 |
| Pro | 4 |
| Premium | 6 |
What You See
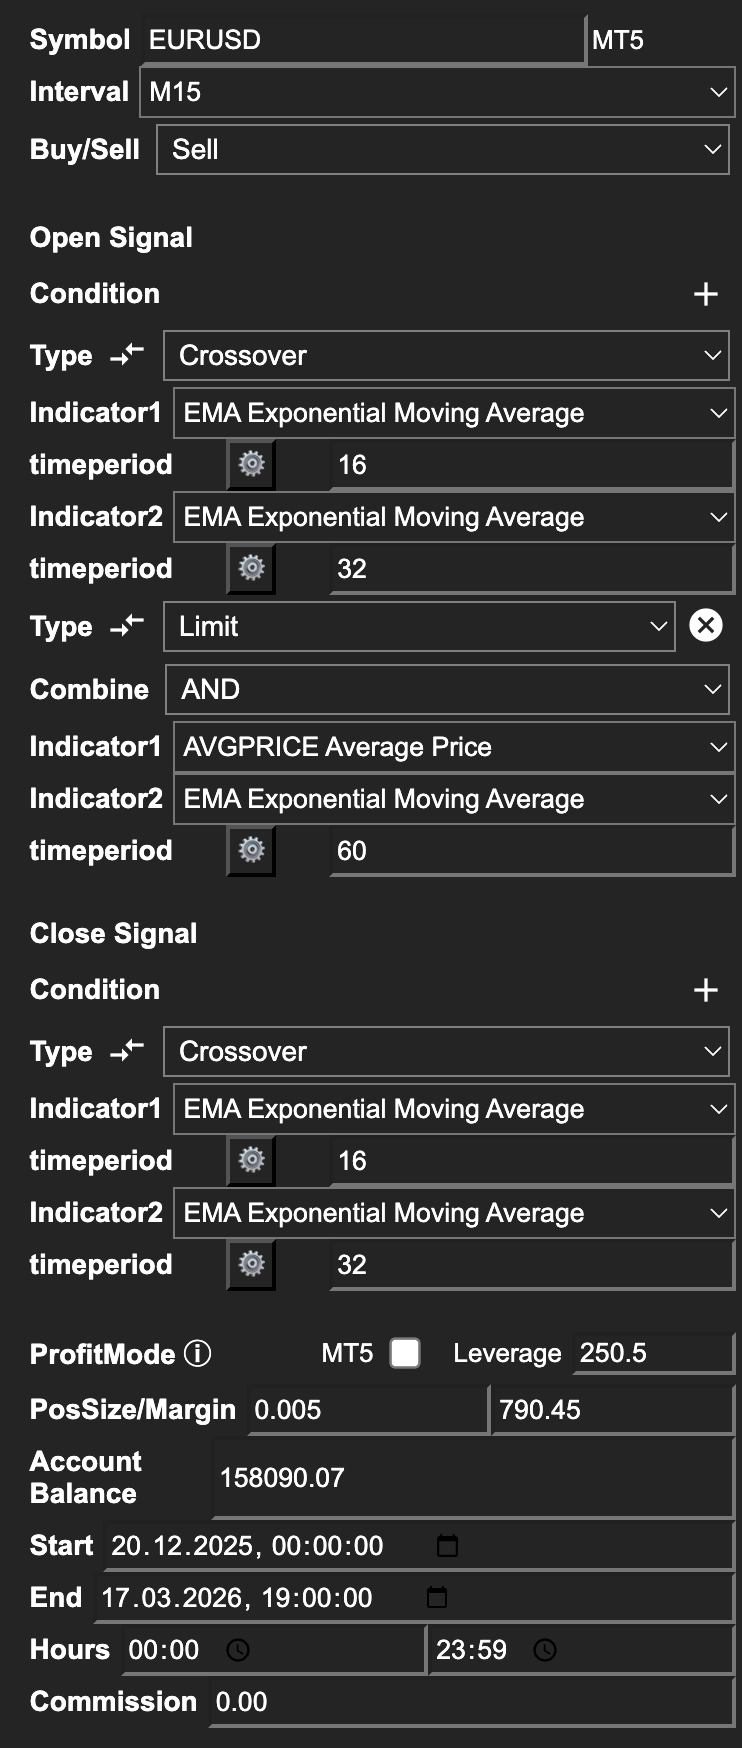
The Strategy tab interface is organized into several sections:
-
Instrument Selection — Choose the symbol you want to trade (stocks, futures, or MT5 instruments depending on your plan). The symbol and data source are populated automatically.
-
Candle Interval — Select the base timeframe for your strategy (e.g., M1, M5, M15, M30, H1, H4, D1). Individual open and close conditions can be evaluated on any other supported timeframe via their per-condition Timeframe dropdown — see Multi-Timeframe Conditions.
-
Direction — Choose whether the strategy trades Buy (long only) or Sell (short only).
-
Open Conditions — Define when the strategy enters a position. Each condition includes selecting an indicator from the dropdown, setting its parameters, and choosing a logic type (Crossover or Limit).
-
Close Conditions — Define when the strategy exits. Options include Take-Profit and Stop-Loss (price % or ATR-based), Crossover exit, and Limit exit.
-
Condition Logic — When using multiple conditions, choose AND (all conditions must be true simultaneously) or OR (any single condition triggers the signal).
-
Position Settings:
- ProfitMode — Controls how margin and position sizing are calculated. When the MT5 checkbox is unchecked, leverage is entered manually and margin is calculated using a simplified formula. When the MT5 checkbox is checked and an MT5 broker account is connected, leverage is fetched directly from your broker and position sizing uses the broker's real margin requirements via MT5's built-in calculation functions — the same calculations used during live execution. See Margin Details below for full explanation.
- Leverage — Manual leverage multiplier. Only active when MT5 ProfitMode is unchecked. Set this to match your broker's leverage for realistic standard-mode backtests.
- PosSize/Margin — The margin fraction allocated per trade, expressed as a proportion of account balance (e.g., 0.2 = 20% of balance as margin per trade). The calculated value displays alongside the input field. Hover over the field to see full Margin Details.
- Account Balance — Starting account balance for the simulation. Balance compounds across trades — winning trades increase the margin budget for subsequent trades, losing trades reduce it.
- Start / End — Date range for the backtest period.
- Hours — Restrict trading to specific hours of the day (e.g., 08:00 to 18:00). Bars outside the configured hours are not loaded, reducing bar consumption and extending calendar coverage within your bar limit.
- Commission — Broker commission fees per trade.
Indicators available for strategy conditions are grouped by category — trend, momentum, volatility, volume, and price-derived — in the Indicator Library. For parameter definitions and descriptions of the most commonly used indicators, see Configuring Indicators.
Margin Details
Hovering over the PosSize/Margin field reveals a Margin Details tooltip showing a real-time breakdown of the position sizing calculation for the current settings.
Standard mode (MT5 unchecked):
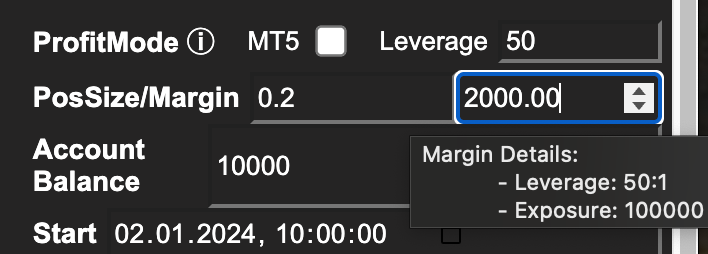
In standard mode the tooltip shows:
- Leverage — The manual leverage value entered in the Leverage field
- Exposure — Total notional position value (Account Balance × PosSize/Margin × Leverage)
MT5 mode (MT5 checked, broker connected):
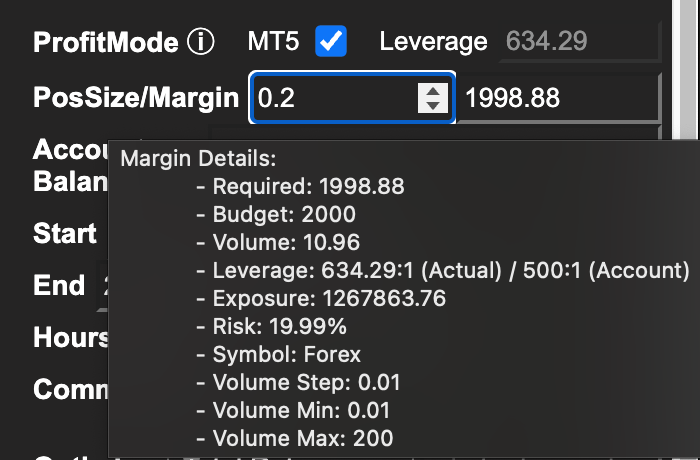
In MT5 mode the tooltip shows the full broker-accurate breakdown:
| Field | Description |
|---|---|
| Required | Margin required to open this position at the broker |
| Budget | Total margin budget available (Account Balance × PosSize/Margin) |
| Volume | Calculated lot size that fits within the margin budget |
| Leverage | Actual leverage applied by the broker vs the account maximum (e.g., 634.29:1 Actual / 500:1 Account) |
| Exposure | Total notional position value in account currency |
| Risk % | Required margin as a percentage of account balance |
| Symbol | Instrument class (Forex, CFD, Futures, etc.) |
| Volume Step | Minimum lot increment for this instrument |
| Volume Min | Minimum lot size accepted by the broker |
| Volume Max | Maximum lot size accepted by the broker |
The actual leverage shown in MT5 mode often differs from the account maximum because brokers apply different leverage rates depending on the instrument, position size, and account tier. The Margin Details tooltip makes this visible before running the backtest — the same leverage and volume constraints that the MT5 backtesting engine and live execution engine use.
Run the same strategy at different Leverage values (in standard mode) or compare standard vs MT5 ProfitMode to visualise how leverage affects equity curves, drawdown, and risk — effects that are often larger than anticipated.
How to Interpret It
A well-constructed strategy has clear, non-redundant conditions. Here is what to look for:
- Condition count — The maximum number of conditions per open and close signal is determined by your plan (1 on Free, up to 6 on Premium). Each condition can use a different indicator and logic type. Multiple conditions are combined with AND or OR logic.
- AND vs. OR logic — AND logic is more restrictive (fewer trades, potentially higher quality). OR logic is more permissive (more trades, broader signal capture). Neither is universally better — it depends on what you are trying to capture.
- Position settings — Balance and position size directly affect the scale of your backtest results. Leverage amplifies both returns and drawdowns. Set these to reflect realistic trading conditions.
Example
A simple EMA crossover strategy on AAPL using H1 candles:
- Instrument: AAPL
- Interval: H1
- Direction: Buy
- Open Condition: EMA(20) crosses above EMA(80) (Crossover type)
- Close Condition: EMA(80) crosses above EMA(20) (Crossover type)
- Balance: 10,000
- PosSize %: 1
- Hours: 08:00 – 18:00
- Commission: 0.00
This strategy enters a long position when the fast EMA crosses above the slow EMA and exits on the reverse crossover. No code required — select the indicators within the condition dropdowns, set the parameters, and click Run. A strategy job is created, and when results load, the chart shows both EMA lines, candle data, and trade entry/exit markers together.