Open Signal Conditions (Crossover, Limit)
What It Is
Open signal conditions define when your strategy enters a position. Strateda supports two condition types — Crossover and Limit — which cover the vast majority of technical entry signals. Multiple conditions can be combined using AND/OR logic to build more sophisticated entry rules.
How to Access It
Open conditions are configured in the Open Conditions section of the Strategy Builder at app.strateda.com. Click Add Condition to add entry conditions. The number of conditions you can use depends on your plan:
| Plan | Max Conditions |
|---|---|
| Free | 1 |
| Plus | 2 |
| Pro | 4 |
| Premium | 6 |
These limits apply to the total number of open conditions in a single strategy.
What You See
Each open condition has the following fields:
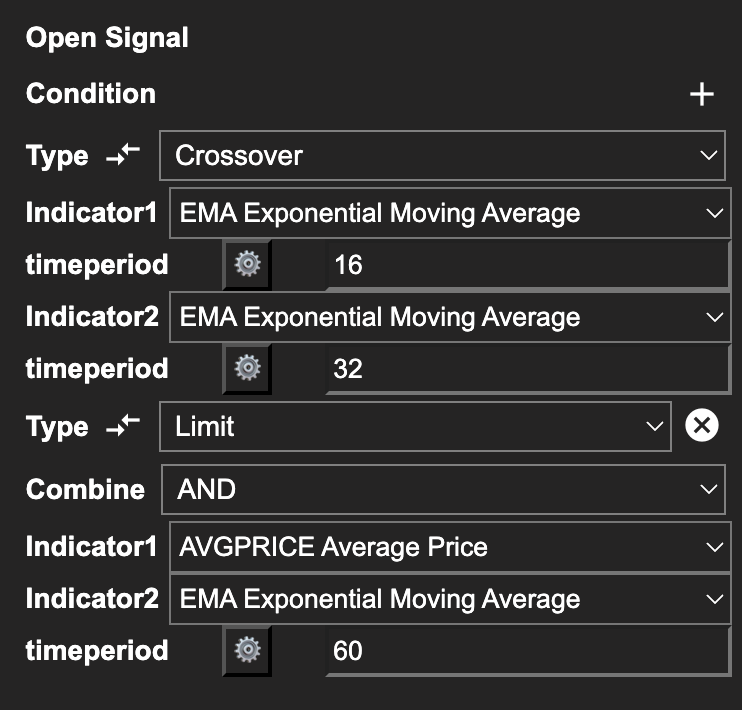
Crossover Condition
A Crossover fires when one indicator's value crosses above or below another indicator's value (or a fixed numeric value).
- Timeframe — The bar interval on which this condition is evaluated. Defaults to
(base), the strategy's primary candle interval. Select any supported timeframe to evaluate this condition independently of the base interval. See Multi-Timeframe Conditions below. - Indicator A — The first indicator (e.g., DEMA with a period of 14).
- Indicator B or Value — The second indicator (e.g., EMA with a period of 21) or a fixed number (e.g., 30).
- Crossover direction — Determined automatically based on the timeperiods of Indicator 1 and Indicator 2. For buy signals, the fast timeperiod crosses above the slow timeperiod. For sell signals, the fast timeperiod crosses below the slow timeperiod. Hover over the arrow icon next to the Type field to see this reminder in the UI.
Example configurations:
- DEMA(14) crosses above EMA(21) — a moving average crossover.
- RSI(14) crosses above 30 — an indicator crossing a threshold value.
- MACD Signal crosses below 0 — a signal line crossing the zero line.
Limit Condition
A Limit condition fires continuously as long as the condition is true on each new candle — unlike Crossover, which fires once at the moment two lines cross. Two variants are available:
Variant A — Indicator vs Fixed Value
Fires when an indicator is above or below a fixed threshold value. The condition is re-evaluated on every candle and remains active as long as the threshold relationship holds.
Parameters as they appear in the UI:
- Timeframe — Same as for Crossover. Defaults to
(base). See Multi-Timeframe Conditions below. - Indicator1 — The indicator to monitor (e.g., RSI)
- timeperiod — The indicator's lookback period
- limit — The fixed threshold value (e.g., 30)
- Comparison — The relationship to evaluate:
indicator < limit— fires while indicator is below the thresholdindicator > limit— fires while indicator is above the threshold
Example configurations:
- RSI(14), limit 30,
indicator < limit— fires while RSI is below 30 (oversold condition, for a buy strategy) - RSI(14), limit 70,
indicator > limit— fires while RSI is above 70 (overbought condition, for a sell strategy) - ADX(14), limit 25,
indicator > limit— fires while trend strength is above 25
Variant B — Indicator vs Indicator
Fires when one indicator is above or below another indicator continuously. No fixed threshold — the comparison is between two live indicator values on every candle.
Parameters as they appear in the UI:
- Timeframe — Same as for Crossover. Defaults to
(base). See Multi-Timeframe Conditions below. - Indicator1 — The first indicator (e.g., EMA)
- timeperiod — Period for Indicator1
- Indicator2 — The second indicator (e.g., TRIMA)
- timeperiod — Period for Indicator2
The condition fires as long as Indicator1 is above Indicator2 for a buy strategy, or below Indicator2 for a sell strategy. The direction is determined automatically based on the Buy/Sell setting.
Example configurations:
- EMA(20) vs TRIMA(50) — fires while the fast EMA remains above the slow TRIMA (trend filter)
- MACD(12,26,9) vs SMA(20) — fires while MACD line is above its longer-term average
Limit vs Crossover — key behavioural difference: Crossover fires a signal once at the moment two lines cross. Limit fires on every candle where the condition holds. This means a Limit condition used as an open signal can re-enter a position immediately after an exit if the condition is still true — behaviour that Crossover does not produce. Choose based on whether you want a one-time trigger or a continuous condition.
Multi-Timeframe Conditions
Every Crossover and Limit condition has a Timeframe dropdown that controls the bar interval on which the condition is evaluated. The default (base) keeps the condition on the strategy's primary candle interval. Selecting any other supported timeframe causes the condition to evaluate independently of the base interval — it is computed on its own timeframe and projected onto the strategy's base bar boundary.
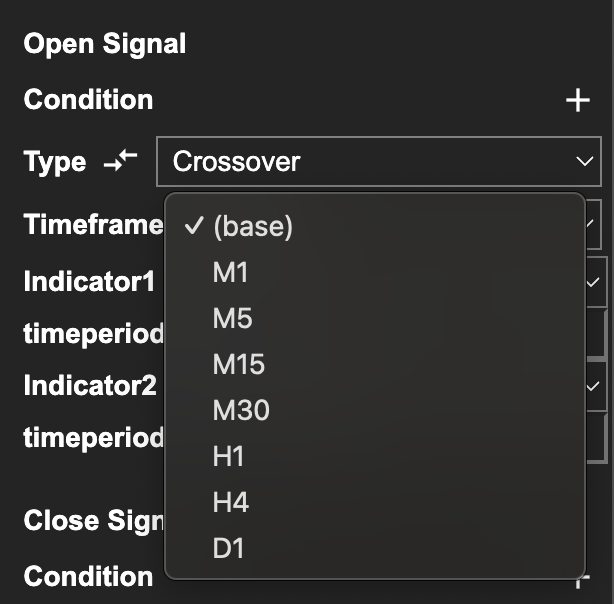
Common patterns this enables:
- Higher-timeframe entry filter — An M1-base strategy that takes entries on an M5 EMA crossover and uses M1 stops and close. Trades execute every minute, but entries are gated by the slower M5 trend.
- Lower-timeframe precision entries — An M5-base strategy that triggers on a faster M1 crossover for more precise entry timing within the M5 bar.
- Mixed timeframes in one strategy — Stack a slow trend filter on H1, an intermediate signal on M15, and a fast trigger on M1, all in the same strategy.
Stop-loss and take-profit conditions evaluate on the base timeframe. Combining them with multi-timeframe entry signals is fully supported — for example, an M5-base strategy with an M1 entry crossover and a 0.05% base-timeframe stop-loss runs end-to-end across both backtest and live engines.
Existing single-timeframe strategies are unaffected. The default (base) setting matches pre-v1.1 behaviour exactly.
Combining Conditions (AND / OR)
When you have two or more conditions, you choose a logic operator:
- AND — All conditions must be true at the same time for the signal to fire. Use this to create filtered entries where each condition adds a layer of confirmation.
- OR — Any single condition being true fires the signal. Use this when you want to capture entries from multiple independent patterns.
How to Interpret It
- Crossover vs. Limit — Crossover is event-based: it fires once at the moment of crossing. Limit is state-based: it remains true for as long as the condition holds. A Crossover entry typically produces more precise timing. A Limit condition is better suited as a filter (e.g., "only enter if ADX is above 25").
- AND logic reduces trade frequency — Each additional AND condition makes it harder for all criteria to align simultaneously. This can improve signal quality but will reduce the number of trades. Fewer trades mean less statistical confidence in backtest results.
- OR logic increases trade frequency — Each additional OR condition adds another way to trigger an entry. This casts a wider net but may introduce lower-quality signals.
Indicators available for strategy conditions are grouped by category — trend, momentum, volatility, volume, and price-derived — in the Indicator Library. For parameter definitions and descriptions of the most commonly used indicators, see Configuring Indicators.
Example
A filtered momentum entry on EURUSD using M30 candles (requires Plus plan or higher for 2 conditions):
Condition 1 (Crossover): DEMA(14) crosses above EMA(14) Condition 2 (Limit): ADX(14) above 25 Logic: AND
This strategy enters a long position only when the DEMA/EMA crossover fires AND the market shows sufficient trend strength (ADX above 25). The crossover provides timing; the ADX filter prevents entries in choppy, directionless markets.